Open topic with navigation
Tender Types
The following Tender Types can be configured in Idealpos (click on any Tender Type to quickly jump to the Tender Type and find out more):
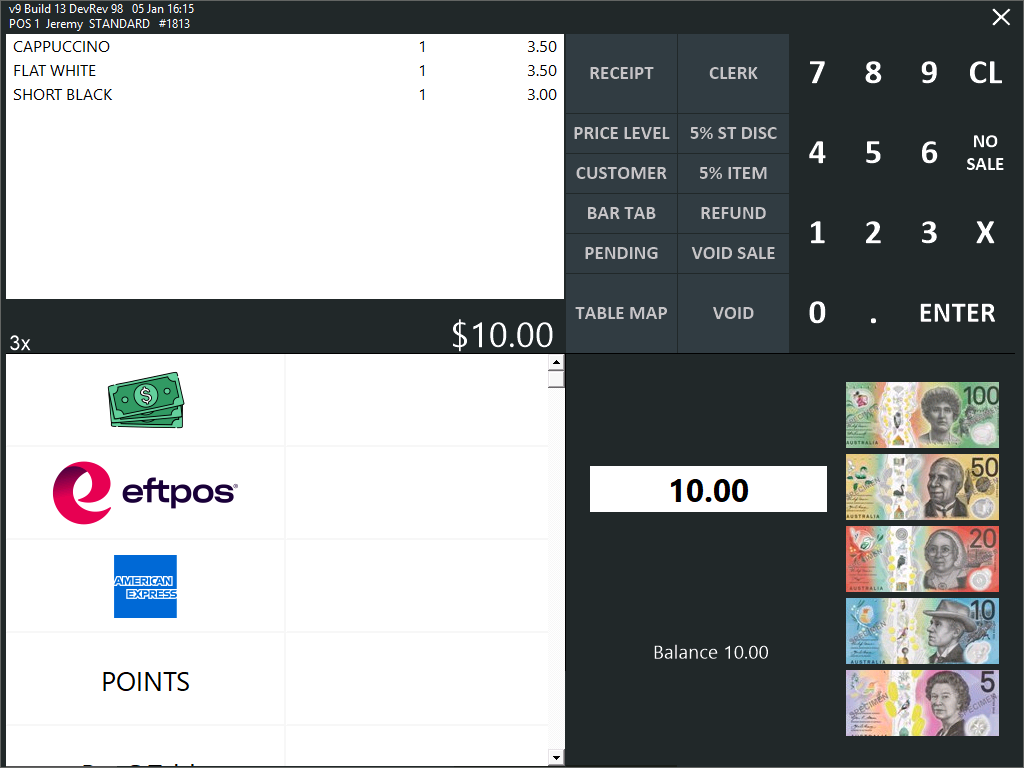
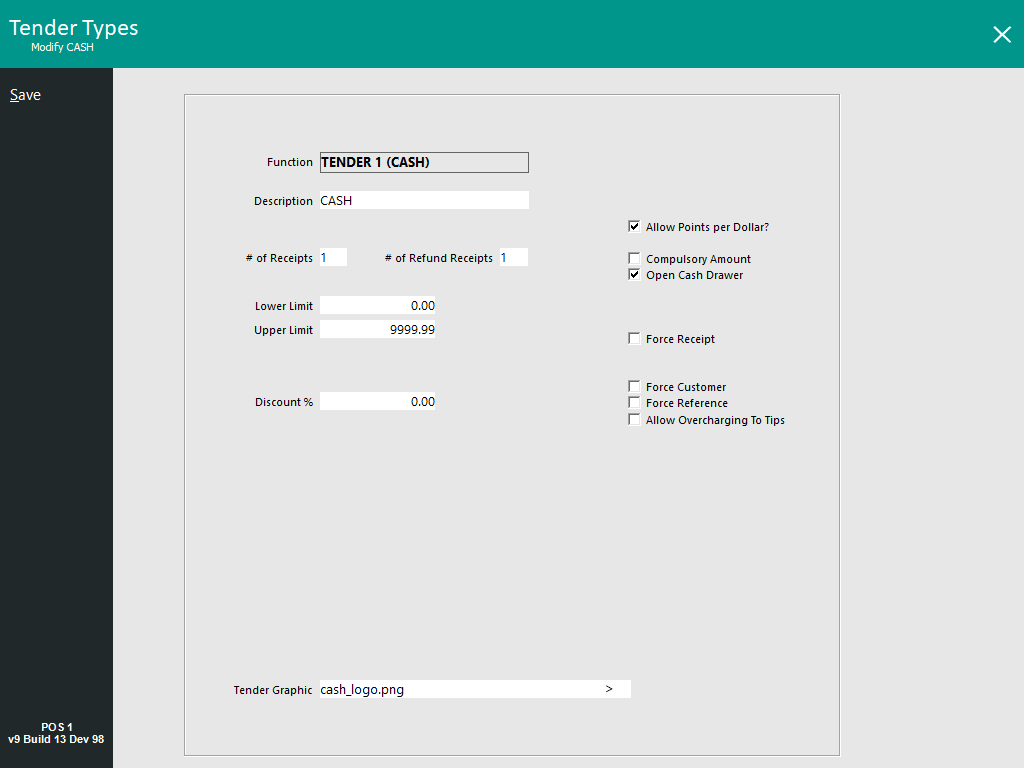
Tender 1 - Cash
The Tender Function for Cash is a special tender that is the default.
There are limited options available when using the Cash Tender.
Description – Change the description that is recorded in the financial details and POS Screen.
# of Receipts – Enter the total number of receipts that you want to print when using this function. This does not force a receipt.
# of Refund Receipts - Enter the total number of refund receipts that you want to print when performing a refund to this Tender Type. This does not force a receipt.
Lower Limit – This is a dollar figure that is the minimum that must be used before this tender can be used.
Upper Limit – This is the dollar figure that is the maximum amount that can be used for this tender.
Discount % – This discount option is only available when the Oolio Pay Global or Oolio Pay AUS/NZ module has been enabled in the Idealpos Licence Gateway. This discount option is only available on the Cash Tender and does not affect other Tenders. Enter an amount to enable a percentage discount on the cash tender. When paying for a sale using Cash, the total sale amount will be discounted by the percentage that has been configured.
Tender Graphic - This option enables a unique Tender Graphic to be configured for each Tender Type. The configured Tender Graphic will appear on each Tender Type's button on the Tender Screen of the POS.
 For tips on configuring the Tender Graphic function, click here.
Tips for configuring the Tender Graphic
Recommended Tender Graphic Image Resolution: A maximum Tender Graphic resolution of 187x64 is recommended.
Supported Tender Graphic File Types: PNG, JPG, BMP.
Sample Tender Graphic Images: The Idealpos Demo Database includes a few sample Tender Graphics; eftpos_logo.png, Mastercard_logo.png, visa_logo.png, cash_logo.png, American-Express-logo.png located in C:\ProgramData\Idealpos Solutions\Idealpos\PicturesDemo.
Tender Graphic Location on a licensed system: On a licensed Idealpos system, Tender Graphic files should be stored in the Pictures folder located in C:\ProgramData\Idealpos Solutions\Idealpos\Pictures\. Browse to this folder location and select the desired Tender Graphic.
Tender Graphic Location on a demo database: On a Demo DB system, Tender Graphic files are stored in the PicturesDemo folder location in C:\ProgramData\Idealpos Solutions\Idealpos\PicturesDemo\.
Tender Grid settings in Global Options
Go to: Back Office > Setup > Global Options > General, and configure the following settings.
Some trial-and-error may be required to achieve the desired appearance, the below settings work well with the sample Tender Graphic images supplied with the Idealpos Demo Database.
Tender Grid Button Height: 1400
Tender Grid Font Size: 20
Tender Grid Line Width: 2
Allow Points per Dollar – This checkbox allows for sales of this tender type to accumulate points for Customer Loyalty.
Compulsory Amount – This checkbox will require the clerk to manually enter the amount to charge to the tender before the sale will calculate it.
Open Cash Drawer – This checkbox will force the cash drawer to open on this tender.
Force Receipt – This checkbox will force a receipt to print to the default receipt printer.
Force Customer – This checkbox will block this tender from being used if a Customer has not been added to the current Transaction.
Force Reference – This checkbox will force the operator to enter a reference against a sale whenever it has been used.
Allow Overcharging To Tips - When this option is enabled and the total amount tendered at the end of the sale exceeds the total amount due, a prompt will be displayed showing the amount that has been Over-Tendered and you will be asked if you want to convert this amount to a tip. Pressing Yes will result in the extra amount being added to the sale as a TIPS IN.
Return to top
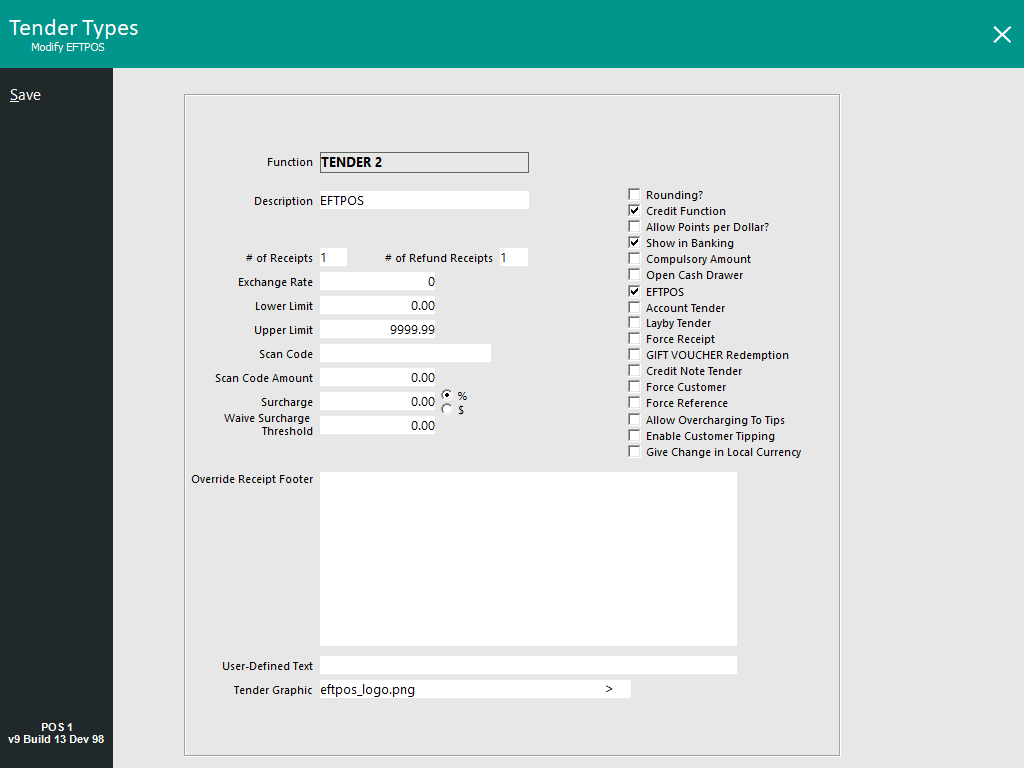
Tender 2 > 30
The Tenders Functions allow you to create multiple Tenders that differentiate between the multiple types of payments available to the customer.
Description – Change the description that is recorded in the financial details and POS Screen.
# of Receipts – Enter the total number of receipts that you want to print when using this function. This does not force a receipt.
# of Refund Receipts - Enter the total number of refund receipts that you want to print when performing a refund to this Tender Type. This does not force a receipt.
Exchange Rate – This can be set to change the amount to the correct rate required for international sales. The Exchange Rate is the value of a single unit of the foreign currency converted into the local currency.
E.g. A venue in Australia accepts USD currency. 1 AUD equals 1.40USD. In this example, you would enter 1.40 into the Exchange Rate.
Note that when accepting foreign currency as payment, any change given to the customer needs to be in the local currency.
Lower Limit – This is a dollar figure that is the minimum that must be used before this tender can be used.
Upper Limit – This is the dollar figure that is the maximum amount that can be used for this tender.
Scan Code – Allows you to have a set scan code to be used for the tender. This may be a voucher.
Scan Code Amount – Allows you to set an amount of each different Scan Code that is added.
Surcharge – Allows you to charge a flat Dollar amount, or fluctuating percent amount to certain sales, to make up for any third party charges that may be incurred by you to accept this type of payment.
There are various User-Defined Options that can be used to alter the behaviour of the Tender Surcharge - Click here for more information.
Waive Surcharge Threshold - Allows you to set an amount where a Surcharge will apply when the amount tendered is less than the amount configured in this field. E.g. If an amount of 10.00 is entered into the Waive Surcharge Threshold, an amount of 9.99 or less paid using this tender will have the Surcharge applied to it and any amount of 10.00 or greater paid using this tender will be exempt from the Surcharge.
Override Receipt Footer – This option allows you to have a custom receipt footer that will print when a specific Tender is used. If there is already a footer configured by default, when the Tender is used, it will be overridden by the Tender footer. Only the Footer text values will be overridden, any logos will still print.
User-Defined Text - This option allows you to enter text that adds custom features or behaviour that is not available in a standard Idealpos installation.
User-Defined Text to Override Receipt Footer on Tender by Receipt Footer - The Receipt Footer can be overridden using the Override Receipt Footer field outlined above. However, this will apply to all POS terminals. Therefore, a User-Defined option can be entered to override the receipt footer for only specific POS terminal numbers. You can enter individual POS Terminal Numbers as a comma separated list, or you can enter a range of POS terminal numbers. If required, you can combine both methods together by specifying both a range of POS terminal numbers as well as a comma separated list.
See examples listed below. When entering the setting into the User-Defined Text field, ensure that you enter the square brackets and the value shown within the square brackets. Enter the POS terminal numbers that you require when configuring your system.
[OVERRIDERECEIPTFOOTERPOS=1] – This will override the receipt footer on POS terminal 1 only.
[OVERRIDERECEIPTFOOTERPOS=1,2,3,4,5] – This will override the receipt footer on POS terminals 1, 2, 3, 4 and 5.
[OVERRIDERECEIPTFOOTERPOS=1-5] – This will override the receipt footer on all POS terminals between 1 to 5.
[OVERRIDERECEIPTFOOTERPOS=1-2,4,5] – This will override the receipt footer on POS terminals between 1 to 2 and POS terminals 4 and 5.
Tender Graphic - This option enables a unique Tender Graphic to be configured for each Tender Type. The configured Tender Graphic will appear on each Tender Type's button on the Tender Screen of the POS.
For tips on configuring the Tender Graphic function, click here.
Tips for configuring the Tender Graphic
Recommended Tender Graphic Image Resolution: A maximum Tender Graphic resolution of 187x64 is recommended.
Supported Tender Graphic File Types: PNG, JPG, BMP.
Sample Tender Graphic Images: The Idealpos Demo Database includes a few sample Tender Graphics; eftpos_logo.png, Mastercard_logo.png, visa_logo.png, cash_logo.png, American-Express-logo.png located in C:\ProgramData\Idealpos Solutions\Idealpos\PicturesDemo.
Tender Graphic Location on a licensed system: On a licensed Idealpos system, Tender Graphic files should be stored in the Pictures folder located in C:\ProgramData\Idealpos Solutions\Idealpos\Pictures\. Browse to this folder location and select the desired Tender Graphic.
Tender Graphic Location on a demo database: On a Demo DB system, Tender Graphic files are stored in the PicturesDemo folder location in C:\ProgramData\Idealpos Solutions\Idealpos\PicturesDemo\.
Tender Grid settings in Global Options
Go to: Back Office > Setup > Global Options > General, and configure the following settings.
Some trial-and-error may be required to achieve the desired appearance, the below settings work well with the sample Tender Graphic images supplied with the Idealpos Demo Database.
Tender Grid Button Height: 1400
Tender Grid Font Size: 20
Tender Grid Line Width: 2
Rounding – This checkbox allows the tender to be rounded up or down depending on the subtotal.
Credit Function – This checkbox used to apply in older version of Idealpos.
Allow Points per Dollar – This checkbox allows for sales of this tender type to accumulate points for Customer Loyalty.
Show in Banking – This checkbox will display the amount tendered as what should be included when banking.
Compulsory Amount – This checkbox will require the clerk to manually enter the amount to charge to the tender before the sale will calculate it.
Open Cash Drawer – This checkbox will force the cash drawer to open on this tender.
EFTPOS – This checkbox will allow the tender to use Integrated EFTPOS and perform additional EFTPOS functions.
Account Tender – Only one tender is able to be selected as Account. This will allow sales to be credited to the customer account.
Layby Tender – Only one tender is able to be selected as Layby. This will allow sales to be saved to layby, with payments made in the future for the purchase of goods.
Force Receipt – This checkbox will force a receipt to print to the default receipt printer.
Gift Voucher Redemption – Allows the tender to accept Idealpos issued Gift Vouchers as tenders.
Credit Note Tender – Allows the tender to accept Idealpos issued Credit Notes as tenders.
Force Customer – This checkbox will block this tender from being used if a Customer has not been added to the current Transaction.
Force Reference – This checkbox will force the operator to enter a reference against a sale whenever it has been used.
Allow Overcharging To Tips – When this option is enabled and the total amount tendered at the end of the sale exceeds the total amount due, a prompt will be displayed showing the amount that has been Over-Tendered and you will be asked if you want to convert this amount to a tip. Pressing Yes will result in the extra amount being added to the sale as a TIPS IN.
Enable Customer Tipping – When this option is enabled, a Customer Tipping prompt will be displayed on both the POS Screen and Customer Display when the Clerk selects this tender from the list of Tender Types during the payment of a sale.
In order to specify which Tender Types will display the Customer Tipping prompt with this option, you will need to DISABLE/uncheck "Enable Customer Display Tipping" via Setup > POS Terminals > Select POS Terminal > Modify > Display/Kiosk.
If you do not uncheck the "Enable Customer Display Tipping" option in the POS Terminal Settings, the Customer Tipping prompt will be displayed for all Tender Types, regardless of whether or not the "Enable Customer Tipping" option has been enabled for specific Tender Types. It should also be noted that Overtendering when Customer Tipping has been enabled is not supported.
Give Change in Local Currency - Enabling this checkbox will enable over-tendering on the selected Tender Type and give the change in local currency (i.e. CASH).
Note that the following logic applies to each tender when over-tendering.
Cash Tender - When over-tendered, change is given in Cash.
EFTPOS Tender - When over-tendered, change is given in Cash.
Credit/Non-Credit Tender - Does not give change, unless the 'Give Change in Local Currency' option is enabled.
Return to top
Open topic with navigation